

Keywords: Money in, Quickbooks Online, Recording Sales, Sales and Customers
Credit: Intuit- Quickbooks Online Photo By: FP
Struggling to Keep Your Books in Order? 📊📅
Let us handle the numbers while you focus on growing your business! Get expert bookkeeping support tailored to your needs.
👉 Click Here for a Free Consultation!
Using estimates in Quickbooks Online.
The first frequent task in the Sales and customers workflow is using estimates. An estimate is a sales form that you can send to your customer to indicate how much your product or service would cost. When an estimate is created in QuickBooks, the progress of the transaction can be tracked.
Estimates are non accounting transactions (sometimes called non posting transactions). This means they don’t get recorded in any account in the general ledger, so they don’t show up in account balances, which means they don’t show up in financial statements such as the profit and loss or balance sheet. They do appear in the details for the customer that they apply to.
If you have created at least one estimate, you will see the Estimates tab in the Sales center, which is where you can create, view, and manage customer estimates. Otherwise, begin at the +New button.
- When an Estimate is approved; Once the estimate is approved by the customer, details can be copied to a purchase order and the estimate can be converted to an invoice.
- Copying to a purchase order: If you are subscribed to QuickBooks Online Plus or Advanced plans you can copy details from the estimate to a purchase order. A purchase order is sent to a vendor and tells them of your intent to make a purchase. It can be helpful to you to copy details from an estimate to a purchase order when you need to purchase items from a vendor in order to fulfill the work outlined in the estimate. Note that bundles don’t carry over to a purchase order, but their items appear individually.
- Converting to an invoice: If you are on all QuickBooks Online plans you can convert the estimate to an invoice. Using estimates in this way as part of the sales workflow saves time and eliminates human error because you don’t have to re-enter information manually. When this is done, the estimate will automatically be marked as Converted in the Sales center, and marked as Closed, even if only partial quantities are added to the invoice.
Recording sales using invoices in Quickbooks Online
Let’s move on to look at the second task—recording sales via invoices. An invoice is usually issued after a product has been delivered or a service has been completed, but before payment has been made. The customer is given terms in which to make the payment. For example, an interior design agency remodels a room and sends an invoice when they have completed the work and notes that the payment for the invoice is due within 15 days.
Unlike an estimate—which is a non accounting transaction—when an invoice is created in QuickBooks, it’s recorded as income, and an entry is made in the accounts receivable account. When payment is received, the receivable is closed and the money is recorded as deposited in the bank.
Recording sales using sales receipts in Quickbooks Online
The third task in this workflow is about recording sales via sales receipts. A sales receipt is usually issued when payment for a product or service is made at the time of the sale. For example, a mobile dog groomer would issue a sales receipt to a customer having completed dog grooming services and receiving payment in cash right away.
When you create a sales receipt in QuickBooks, it increases income, with an entry made in a bank account because payment is already included in the transaction.
Note that unlike invoices, when recording a sale via a sales receipt, the sale and payment are recorded at the same time, so there’s no need to receive payment in the same way as with invoices, making the process more efficient.
Using the Undeposited Funds account Quickbooks Online.
You often receive payments from customers—either for invoices or payments recorded via sales receipt—that aren’t deposited into the your bank account right away. Instead these payments are grouped together and deposited at the bank as a single deposit. This means that individual payments received from customers won’t show up in the bank feed. Instead the total deposit amount will show. It can be confusing, and if handled incorrectly, it could create an accounting issue and a customer service issue, so it’s important to get it right.
Using the Undeposited Funds account (sometimes called Payments to Deposit) is the best way to keep track of payments until they are deposited in the bank. Using it consistently is key. Getting into the habit of always using the Undeposited Funds account when recording payments saves a lot of headaches later.
The process;
People often struggle to grasp the function of the Undeposited Funds account, so it’s a great opportunity for you to understand the value of it. Let’s take a closer look at how to use this account as part of the sales workflow.
Keep in mind that parts of this process are about what happens in real life (outside of QuickBooks) and parts are about what happens inside QuickBooks.
- Record the sale in QuickBooks
As you already know, sales transactions are recorded in QuickBooks either via an invoice or a sales receipt.
- Collect the payment
Outside of QuickBooks, you collect a payment by cash, check, or credit card (not using QuickBooks Payments).
You are not going to deposit the cash or check into the bank immediately—you are going to hold it until the weekly trip to the bank, for example.
Or for a credit card payment, there may be a delay of a few days before it clears the bank. (If several payments are run through a credit card processor in a single day, they may be aggregated into a single deposit in the bank account.)
- Record the payment in QuickBooks
Record the payment in QuickBooks either via Sales receipt or by Receiving payment for an invoice, and allocate to the Undeposited Funds account.
This is a temporary holding account that tracks payments received from customers that have not been deposited to your bank account. Recording these payments in Undeposited Funds is like making a note of money you have put in a safe.
Recording that you have received payment for an invoice:
- Increases (debits) the Undeposited Funds account
- Decreases (credits) the Accounts Receivable account
- Recording that you have received payment via a sales receipt:
- Increases (debits) the Undeposited Funds account
- Increases (credits) the Sales account
- Make the deposit at the bank
When you deposit the payments at your bank it’s likely that you will fill out a deposit slip, stating the total amount deposited.
- Record the bank deposit in QuickBooks
When the payments are deposited at the bank this should be recorded in QuickBooks.
By holding payments received in the Undeposited Funds account until they are deposited, a single Bank deposit record can be created in QuickBooks for these multiple payments, making it easier to match it to the deposit transaction that clears the bank and comes into QuickBooks via the bank feed.
When the bank deposit is recorded in QuickBooks, it:
- Increases (debits) the bank account
- Decreases (credits) the Undeposited Funds account
- Deposit transaction comes in via bank feed
When your bank account is connected to QuickBooks, bank transactions come in via the bank feed, ready to be matched to existing records in QuickBooks, or if no record exists, to be categorized appropriately.
Because the payments have been grouped together and deposited at the bank as a single deposit, the total deposit amount will show up in the bank feed.
- Match bank feed transaction with deposit record
When the bank feed transaction is matched with the bank deposit recorded in QuickBooks, the register is updated accordingly ready for month-end reconciliation.
In action
Now that you’ve looked at the process, let’s dig in to see what it looks like in QuickBooks by following a couple of transactions on their journey through Undeposited Funds.

First stop is the undeposited funds register, accessed via the chart of accounts. The payments will sit here when the Undeposited funds accounts is selected from the Deposit to dropdown when recording a sales receipt or payment of an invoice.
There are 2 transactions here that haven’t been reconciled- that is, the record of them here in Quickbooks haven’t been matched to a record in the your bank account. Right now, these payments have been received from the customer and are waiting to be deposited at the bank.
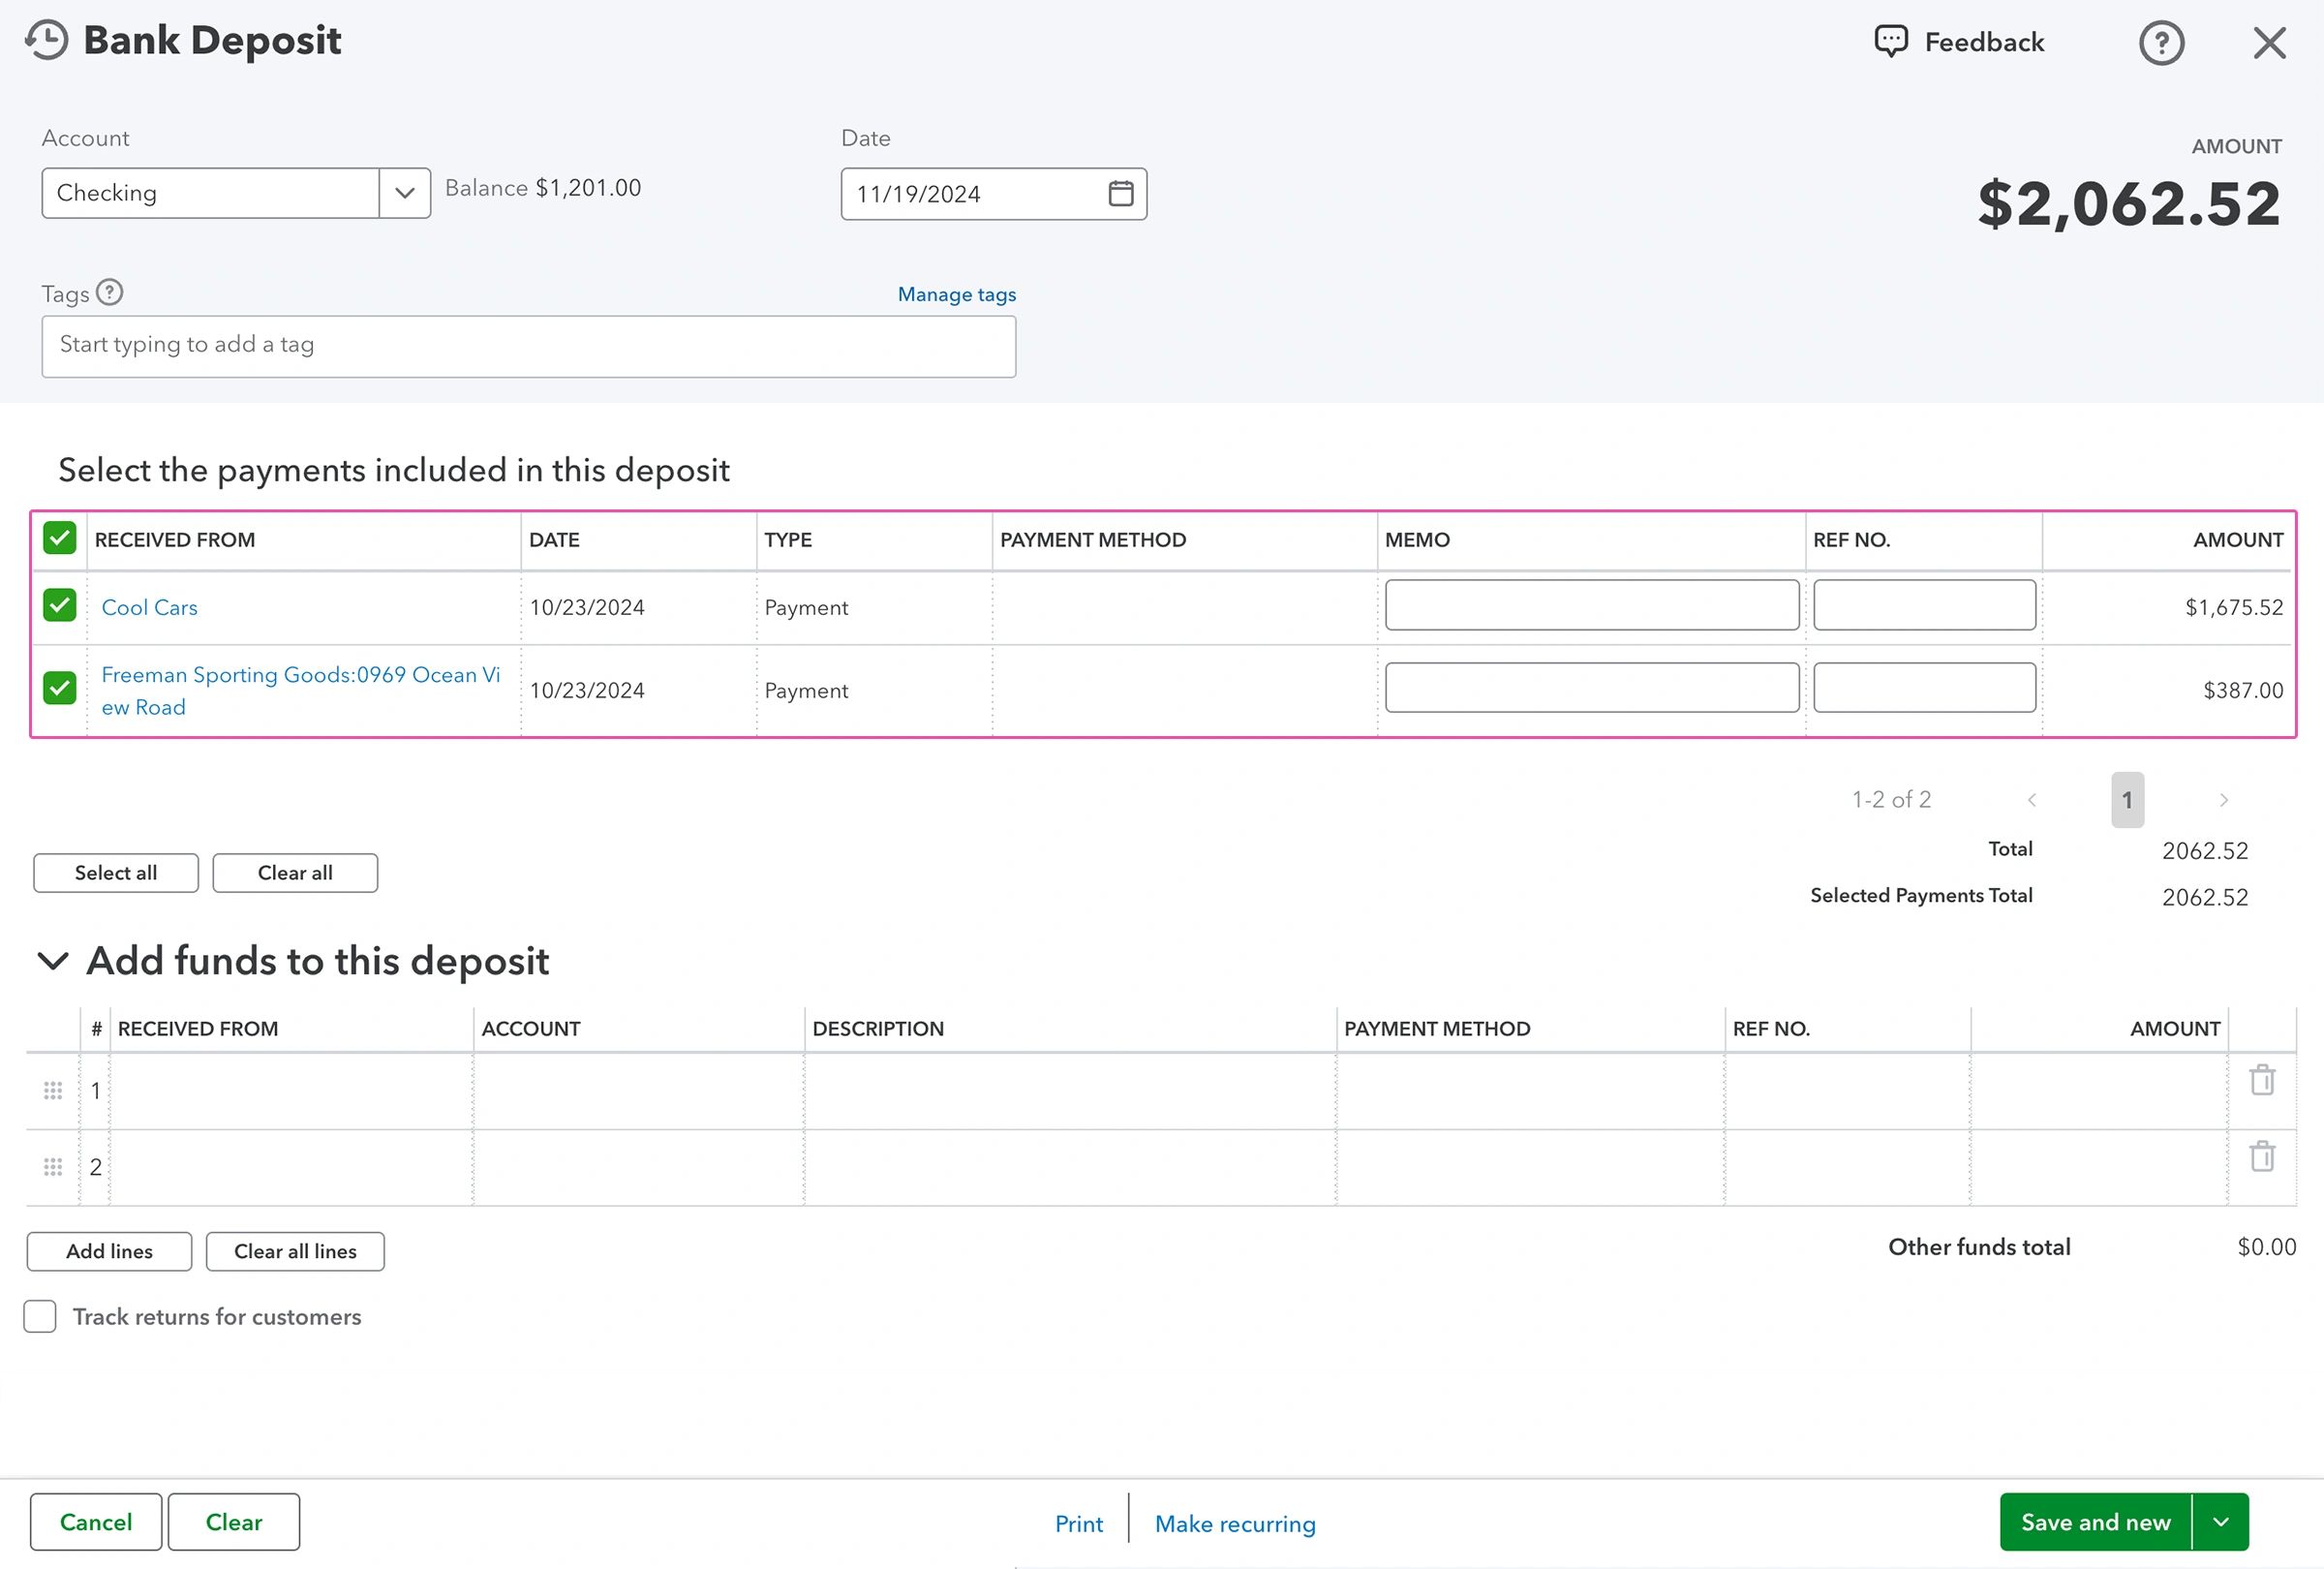
Next, the trip to the bank needs to be recorded. Select + New and then Bank deposit to open this screen.
You can see the two transactions sitting in the Undeposited Funds account are listed here. They can be selected to be added to this bank deposit. Selecting both updates the bank deposit total to $2,062.52. This number is what gets recorded as a single amount deposited at the bank.

Let’s now jump ahead to the Banking workflow to follow the transactions to the end. You can now see all the transactions that have come into QuickBooks via a feed from the your Bank account.
These transactions need to be paired up with their equivalent existing transactions already in QuickBooks (if there are any).
We know that there is a record in QuickBooks of depositing $2,062.52 at the bank, and here is the same deposit recorded from the bank’s side. QuickBooks has suggested a match so you need to verify that it’s accurate

Selecting transactions in the bank feeds expends it, Select the Deposit link to find out more about it.

This opens the bank deposit record created in the step 2 of this walkthrough, you can see 2 payments that make up $2,062.52 deposited at the bank

This verifies the match suggested by quickbooks in the bank feeds, so it can be accepted by selecting the match button. And thats the end-to-end process for using the Undeposited funds account.
It’s common for people to misunderstand how to use Undeposited Funds. Using the Undeposited Funds account incorrectly may result in overstated income, which could lead to incorrect financial information, and even paying higher taxes.
For example, you receive several payments and record each directly to the bank account. The payments are combined together as a deposit, but the individual transactions are not grouped together in QuickBooks, so the deposit is recorded as income, thus overstating income from the deposit and the invoices for which that deposit should have been connected.
One payment received directly to Undeposited Funds or the bank account will match. But when multiple customer payments are deposited together, it can be messy! This is why it’s best practice to always use Undeposited Funds.
QuickBooks Payments
When you use QuickBooks Payments, customer deposits are a breeze—essentially payment and accounting are done at the same time, eliminating manual entries.
It enables you to add links to invoices so your customers can pay online with PayPal, Venmo, credit card, or ACH bank transfer. All they have to do is follow the link in the email. Payments can also be processed in person or over the phone. Once a payment is made, everything is entered inside QuickBooks automatically:
- Payment is recorded in QuickBooks
- Deposited into the bank account and automatically matched to the deposit when it clears the bank
- Transaction fees are recorded and properly categorized
Recording noncustomer deposits in Quickbooks Online.
Let’s look at the final task in this workflow. Sometimes you receive deposits that aren’t related to customer transactions, such as vendor or tax agency refunds, cash contributions from owners, or proceeds from loans. These need to be recorded accurately so that they’re not confused with sales income, which shows on sales reports.
Because these deposit transactions aren’t income and don’t relate to customers, sales forms shouldn’t be used to record them. Use the Bank deposit feature to record and categorize any money coming into the business that isn’t related to sales.
Use the Bank deposits feature when:
- You receive funds from loan proceeds or contributions of cash from owners.
- You receive a refund from a vendor and wants to record it directly against the associated expense account.
- You receive a refund from a tax agency and needs to record it to reduce the tax liability or expense account.
- An employee reimburses your company, and you need to record the reimbursement against the employee loan receivable account.
- You don’t record income using sales transactions (invoices or sales receipts) and you want to record deposits directly to income accounts. Generally this isn’t best practice, but there are exceptions—for example, a medical practice that uses medical billing software to keep track of their accounts receivable to stay compliant with privacy legislation, or an e-commerce store that doesn’t connect to QuickBooks.
Generally Bank deposits shouldn’t be used to record sales. By doing it this way, individual sales won’t be tracked which leads to a lack of meaningful information on sales reports; you won’t be able to send your customers documentation, such as invoices or sales receipts; and the transaction won’t show up in the customer’s activity log.
Using the Bank deposit feature for a noncustomer deposit
Let’s take a look at how to record money received as a tax refund, starting from the +New button and selecting Bank deposit.

Firstly specify the account the money is being paid into and the date of the transaction record. Then move on to the Add Fund to this deposit section

In the Received from column, select who has issued the payment. This shouldn’t be a customer and could be a vendor or employee.

Now select the appropriate account in the Account column. In this case, it’s Refunds-Allowances, which is an account that Quickbooks doesn’t use for sales transactions.

Add a Description, Payment method, the payment’s reference number and the Amount.

You can add attachment to this bank deposit, if you wish. In this case of IRS Refund, which isn’t a typical transaction, having an image of the check could be helpful.

You can add multiple funds to the same deposit by checking the boxes next to items in the Select the payments included in this deposit section. For example, you might include customer payments along with this tax refund in the single deposit transaction. This is optional-this could be a standalone noncustomer payment. When you’re done, select Save and close
Check out our Free Additional Articles